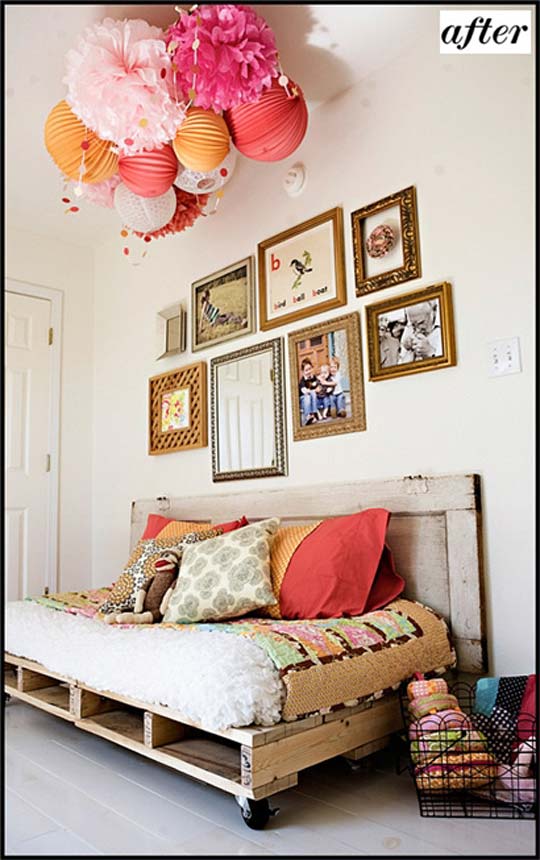
The creativity behind this romantic sofa is inspiring and super chic. Made from two discarded shipping palettes, an old door, casters and covered with vintage pillows. Gorgeous! (source:apartment therapy)
Do-It-Yourself
August 23, 2009
December 01, 2008
October 03, 2008
August 19, 2008
August 12, 2008
July 25, 2008
- MODERN FURNITURE
eRoomService - Premiere destination for contemporary bedroom furniture, modern dining furniture and designer Italian sofas and sectionals
Green ^ Sponsors
- Translator
Blog Roll
- Apartment Therapy Re-Nest
- Care2
- City Dirt
- Cichlids
- Crafting a Green World
- design is mine
- Eco Fabulous
- Eco Street
- Eco-Chick
- ecosalon
- fabulously green
- Fig+Sage
- Gaiam Experts Blog
- Green Living
- Get Insanity Workout
- Jolly Green Girl
- Life Begins at 30
- Live Green on a Budget
- lou-la-la
- Ma Vie en Vert
- Peas and Bees
- Reclaimed Home
- so sweet & so cold
- Sprig
- The Daily Green
- You Grow Girl
Categories
- Architecture
- Argentina
- Art
- Bags
- Bathrooms
- Beds
- Benches
- Blankets
- Books
- Cabinet
- California College of the Arts
- Cards
- Cars/Automobiles
- Ceramics
- Chairs
- Chandelier
- Christmas
- Claire
- Color
- Compost
- Contest
- Cozy
- Craft
- Designer Profile
- Dining Rooms
- Do-It-Yourself
- Eco Media
- Fashion
- Fireplaces
- Food and Drink
- Furniture
- Groupings
- Hand-made
- Home Tours
- Jewelry
- Kids
- Kitchen
- Kristen
- Lighting
- Living Rooms
- Magazines
- Make-Up
- Materials
- Misc.
- Pendant Lighting
- Pets
- Pillows
- Pottery
- Pregnancy
- Purses
- Recycled
- Rugs
- Sofas
- Solar Energy
- Sports
- Stools
- Stores
- Tables
- Television
- TGIF
- The Conflicted Thimble
- Toys
- Vases
- Wallpaper
- Web/Tech
- Winter
- Wood
